The Case
There are just too many eFAST cases to choose from. Which one to tell you…? Should I talk about my first eFAST patient, the supposed-to-be-simple-but-really-wasn’t, coumadin guy who laid out his motorcycle? What about the lady from the rollover down a twenty foot embankment? Or the teenager from a horseback riding accident? Should I tell you about the night I hung out in resuscitation and did an eFAST on every patient that came through? A December night in medical school I like to think of as Ultrasound Christmas. A night when a trauma alert rolled in and before I knew what was happening, the resident put the ultrasound probe in my hand and said “Go for it!” Needless to say it was AWESOME! Like do-a-secret-happy-dance-in-the-hallway-afterwards kind of awesome. I definitely loved my ultrasound elective, especially once I became competent at eFASTs. So what’s an eFAST you ask? It’s simple really. It’s a systematic ultrasound scan to check for pneumothorax and free fluid (usually blood) in the abdomen and chest. It’s quick, easy, and incredibly useful. You don’t have to be a genius for this stuff. My first year med students can do this and so can you! If you’re going to spend time in the Emergency Department or with critically ill patients, you should learn the eFAST. End of story. So now that you’re convinced… just how do you do an eFAST?
What’s eFAST All About?
The eFAST is a fast (pun intended) and easy way to check for blood in the chest and abdomen. eFAST is an acronym for extended Focused Abdominal Scan for Trauma. It’s an ultrasound exam designed for trauma patients that can be used at the bedside without interrupting ongoing care. Unstable patients with positive eFAST scans can then receive definitive care (get a chest tube, go to surgery, etc.) without the delay of waiting for a CT. The exam is a set of scans that quickly visualize free fluid (like blood) in the anatomical sites it most commonly collects, so the trick to quickly interpreting an eFAST exam is learning just where free fluid tends to collect. An eFAST looks at the right upper quadrant (RUQ), left upper quadrant (LUQ), pelvis, heart, and lungs. (Lungs are the extended part of the exam. Without the lung component it’s just called a FAST exam.) So that’s five ultrasound views, six if you’re picky about the whole 2 lungs thing, and you’ve completed an eFAST exam. It takes less than 5 minutes to complete, but more like 2 minutes as you approach ultrasound rock star status. Plus it’s more sensitive than x-ray for conditions like pneumo or hemothorax. Basically, eFASTs are a great ultrasound scan for rapidly identifying bleeding and other common injuries in the trauma patient.
The Patient: Who Gets an eFAST?
- Blunt and penetrating abdominal trauma
- Blunt and penetrating chest trauma
- Ectopic Pregnancies
- Suspected abdominal or thoracic free fluid or active bleeding
How Do I perform an eFAST?
Ultrasound Terms You need to know a few fancy words because this is medicine and that’s what we do. Get used to it:
- Hyperechoic: when an image is brighter than surrounding tissue (due to greater reflection of sound).
- Hypoechoic: when an image is darker than surrounding tissue (due to less reflection sound).
- Anechoic: when an image is jet black (no reflection). Free fluid is jet black / anechoic.
- Isoechoic: when two areas of tissue are similar in brightness (usually due to similar densities).
Ultrasound Basics:
- Select a lower frequency probe (curvilinear or phased array) when performing an eFAST
- Lower frequency = deeper penetration and better visualization of deeper structures
- Note the marker on the probe. It corresponds to the marker on the ultrasound screen. This helps you orient what you’re seeing on the screen with the probe position.
- Marker position is important for proper scanning technique – traditional marker orientation is always either towards the patient’s head or the patient’s right side.
- Structures at the top of the screen are closer to the probe than images at the bottom of the screen
- As noted above, free fluid is anechoic. The presence of free fluid = positive eFast. Morrison’s pouch is the first place fluid typically collects in the upper abdomen; the pelvis is the first place you’re likely to see fluid in the lower abdomen.
- Bone blocks sound wave transmission (and since ultrasound is based on sound waves… you get the picture). Rib shadowing may block your image, so you may have to move the probe around to find a good viewing window. That’s normal.
- If you have difficulty finding a good image on the RUQ/LUQ views, turn the probe obliquely to see between the ribs.
Scanning Technique
Heart
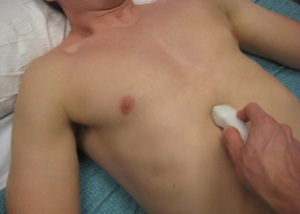
- Probe position: Subxyphoid View
- Probe marker towards patient’s right
- Place the probe just inferior to the xyphoid (… like the name says)
- You may need to shift just right of the xyphoid to get a good image of the heart because the liver is your acoustic viewing window and it may not extend across to the middle or left
- Now take your probe handle and lay it flat against the abdominal wall
- Your probe is now pointing towards the patient’s head
- It’s going to feel like you’re pinching the probe between your fingers and a bit like holding a pencil
The image:
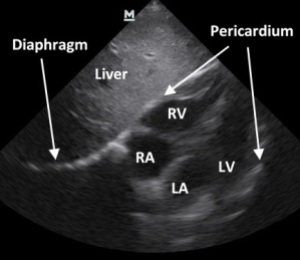
- You should be looking at the heart, obviously, but you’re seeing it through the liver
- The liver is your acoustic window (it makes the image clearer, trust me)
- All 4 chambers should be relatively visible
- The right ventricle and atrium are towards the top of the screen (immediately next to the liver) with the pericardium represented as the single thin hyperechoic (white) line around the heart
Interpretation:
- A positive exam has free fluid
- Here you’re looking for free fluid in the pericardium, also known as a pericardial effusion
- It will look like a black stripe between the heart and the pericardium
- The fluid will collect in the pericardium nearest the liver (by the right ventricle) and potentially wrap around the apex of the heart
- Don’t be fooled by epicardial fat pads. They’re in the pericardial space and can be dark, but not as dark as fluid. So if it’s not jet black, it’s probably just epicardial fat. Also, the heart will move “with” an epicardial fat pad but will move “within” a pericardial effusion.
- Look at the heart’s global function. Is it moving? Is the right atrium or ventricle collapsed? Does it look like the heart is being crushed by an effusion?
Percardial tamponade, when fluid around the heart prevents the heart from expanding/filling, is a medical emergency! Take a second to fix the code brown that just happened in your pants. And do something! Now!
Subxyphoid Clips:
Subxyphoid – Normal
Right Upper Quadrant View (Perihepatic)
Probe position:
- Marker oriented towards patients head
- Place the probe in the mid-axillary line between the 8th and 11th rib to find the liver
- After you’ve scanned the liver-kidney interface, slide up and look at the diaphragm
The image:
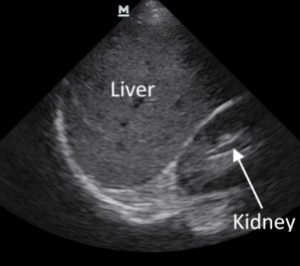
- Two words… Morrison’s Pouch (aka the heptorenal recess)
- This is the area of primary interest in the RUQ
- Follow the liver-kidney interface from superior to inferior pole
- Look above the liver at the liver-diaphragm interface, then look just above the diaphragm
Interpretation:
- A positive exam has free fluid
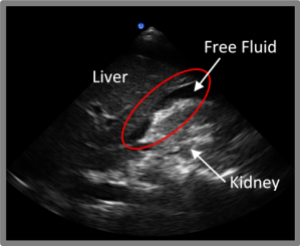
- Fluid will collect in Morrison’s pouch AND can collect above the liver (between liver and diaphragm)
- Fluid will appear as a stripe between the interfaces
- Morrison’s pouch is the most sensitive area for free fluid in the abdomen
- A pleural effusion or hemothorax will create a stripe or triangle of fluid just above the diaphragm
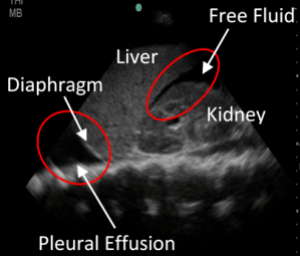
RUQ Clips:
RUQ – Positive (with hemothorax)
Left Upper Quadrant (Perisplenic)
Probe position:
- Probe marker towards patients head
- Place the probe in the posterior-axillary line (knuckles touching the bed) between the 6th and 9th rib to find the spleen
- Once you’ve scanned the spleen-kidney interface, slide up and look at the diaphragm

The image: (rinse and repeat the RUQ scan)
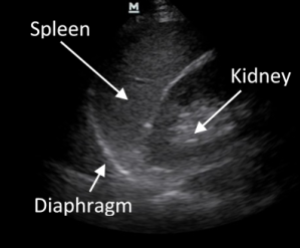
- Spleenorenal recess
- Follow the spleen-kidney interface from superior to inferior pole of the spleen
- Look above the spleen at the spleen-diaphragm interface
- Look just above the diaphragm
Interpretation:
- A positive exam has fluid. Big shock.
- Fluid can collect between the spleen and the kidney AND above the spleen (between spleen and diaphragm)
- Fluid will appear as a dark stripe between the interfaces
- A pleural effusion or hemothorax will create a stripe or triangle of fluid just above the diaphragm
LUQ Clips:
See “Life in the eFAST Lane Part 2” for pelvis and lung scans!
Relevant Anatomy – The Brains Behind an eFAST
The heart of an eFAST is anatomy. Obviously, knowing your anatomy and the relationship between structures is important to an eFAST. If you can’t find a kidney, you’re out of luck (and unless you’re my mom, I’m not sure why you’re reading this anyways). But the real magic of anatomy is that it allows us to know where blood will collect first. Thanks to fascia and other physical structures free fluid consistently flows to the same places, making it possible for us to identify free fluid from thoracic and abdominal bleeding with only a few ultrasound views. Gravity is another important factor here. Free fluid flows to the most dependent area (that means the lowest point) of an anatomic compartment as a result of gravity. So physical barriers create anatomic compartments (like the pericardium around the heart or the peritoneum in the abdomen) that limits where a fluid can travel AND gravity forces the fluid to accumulate in the most dependent areas. After that, there’s potential spaces to consider. Normally these are low volume spaces, but can expand to large volumes if occupied by fluid (like blood) or air. If you can visualize free fluid in a potential space, there’s probably badness going on. Basically, the anatomy allows us to determine where free fluid should collect and visualize that free fluid quickly using ultrasound. This is the basis of an eFAST exam. Now let’s talk specifics…
The heart scan is a quick and dirty scan. You’re just looking for free fluid in the pericardium and checking for cardiac tamponade. The pericardium is a fibrous sac surrounding the heart, which has little stretch to it. When an injury bleeds into the pericardium, increased pressure squeezes the heart. If that pressure exceeds right chamber pressures, the heart chambers can collapse and prevent both cardiac filling and output. This is bad, bad, bad! This is the code brown situation I was talking about earlier. Thankfully, the subxyphoid view of the heart not only visualizes the pericardium, but also visualizes the right atrium and ventricle. This lets you assess if there is any atrial or ventricular collapse. Another point to note for this scan is that you’re using the liver as an acoustic window. Sound travels well through the liver, so it gives you a much clearer image if you use the liver to look at the heart. If you’re having trouble getting an image, remember to shift a little right (that’s patient right) of the xyphoid to better use the liver. The liver’s other role is as a landmark. The most dependent point in the pericardium is against the diaphragm, right next to the liver. This is the first place you’ll see fluid in the pericardial sac.

The RUQ view visualizes the most dependent area in the supine patient, Morrison’s pouch. It’s the potential space between the liver and the right kidney. Because of its ability to expand and extreme dependence (low position) Morrison’s pouch is one of the first areas that intra-abdominal free fluid flows in a supine patient. Even fluid from the LUQ tends to flow here before it collects in the LUQ. Fluid can also collect between the liver and diaphragm, so remember to check there too. 
The LUQ view visualizes the spleen and left kidney. Since the left kidney is higher than the right, move your probe a little superior when shifting from RUQ to LUQ scan. The spleenorenal recess (spleen-kidney interface) is a potential space, so examine it for free fluid. It is not nearly as dependent as Morrison’s pouch, so fluid will collect in other places in the RUQ too. Be sure to check the liver-diaphragm interface and the upper and lower portions of the spleen before you move on. 
Both the RUQ and LUQ views visualize above the diaphragm. This is important because just above the diaphragm is an important dependent area of the lungs. If you’re going to see free fluid in the lungs, you’ll probably see it here. If there is free fluid above the diaphragm, think hemothorax or pleural effusion.
To be continued in “Life in the eFAST Lane (Part 2)”…
References
- Dawson M, and Malin M. Oct 24, 2012. Introduction to Bedside Ultrasound. pp 2-24. Emergency Ultrasound Solutions.
- Dawson M, and Malin M. September 21, 2011. “Episode 08 – A Song for A Scan”. Ultrasound Podcast. http://www.ultrasoundpodcast.com/2011/09/a-song-for-a-scan/, March 2013.
- Lewiss RE, Saul T, and Del Rios M. January 2009. “Focus On: EFAST – Extended Focused Assessment With Sonography for Trauma”. ACEP News. http://www.acep.org/Content.aspx?id=43640, March 2013.
- Ma OJ, Mateer JR, Ogata M, Kefer MP, Wittmann D, Aprahamian C. Prospective analysis of a rapid trauma ultrasound examination performed by emergency physicians. Journal of Trauma, 1995; 38:879-85.
- McNamara D. October 2008. “Use FAST to Quickly Find Fluid in Abdomen, Around Heart”. ACEP News. http://www.acep.org/content.aspx?id=41934, March 2013.
- Plummer D, Brunette D, Asinger R, Ruiz E. Emergency department echocardiography improves outcome in penetratic cardiac injury. Annals of Emergency Medicine. 1992; 21:709–12.
- Reardon R. 2008. “Ultrasound in Trauma – The FAST Exam Focused Assessment with Sonography in Trauma”. Ultrasound Guide to Emergency Physicians. http://www.sonoguide.com/FAST.html, March 2013.
- Rothlin M.A., et al. Ultrasound in blunt abdominal and thoracic trauma. Journal of Trauma. 1993; 34:488-95.
- Rozycki GS, Feliciano DV, Ochsner MG, et al. The role of ultrasound in patients with possible penetrating cardiac wounds: a prospective multicenter study. Journal Trauma. 1999; 46:543-51.
- Stone M. “Emergency Ultrasound Exam”. American College of Emergency Physicians. http://www.emsono.com/acep/exam.html, March 2013

4 thoughts on “Life in the eFAST Lane: Sonography for Trauma (Part 1)”