
Figure 1 – An eFAST Rockstar in Action
How to Do I Perform an eFAST? (Continued from Part 1)
Pelvis
Probe position
- Probe marker towards patient’s head (longitudinal view) or towards patient’s right (transverse view).
- Place the probe just above the pubic symphysis and look for the bladder in men and both the bladder and uterus in women.
- If it’s not awkward, it’s not right and you’re not low enough.
- Once you’ve completed the longitudinal view, turn your probe 90° for the transverse view. Both views should be evaluated to avoid false positives.

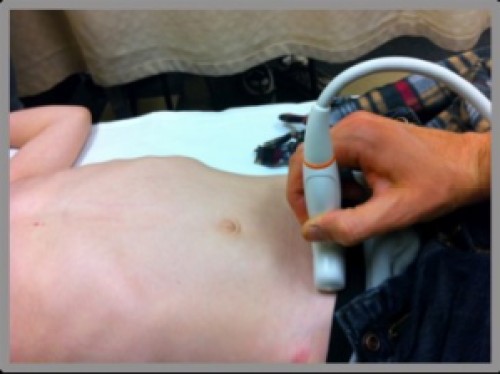
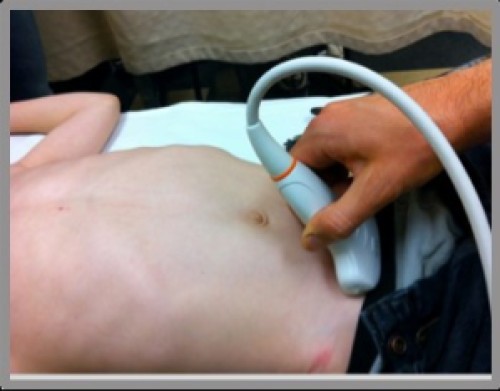
The Technique
- Scan through the ENTIRE bladder in two planes.
- Be sure your probe is perpendicular to the patient when scanning. Do not crank the probe to extreme angles to find the bladder.
- If you’re not seeing bladder with the probe perpendicular to the patient, slide it down in a plane parallel to the patient. This is very important to avoid false negatives and positives that can occur when you view the pelvis at the wrong angle (which is anything but 90° from the skin surface).
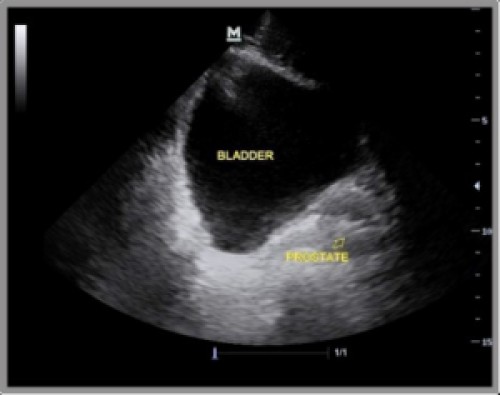
The image (male)
- Find the bladder. The rectovesicular pouch (between rectum and bladder) is immediately posterior to the bladder. This is where free fluid is going to collect in the pelvis.
- Now find the prostate (It’s the round structure posterior and slightly inferior to the bladder). Scan towards the patient’s head until it disappears. Because the prostate is an extra-peritoneal organ it’s an important landmark. It marks the start of the rectovesicular pouch.
- Scan the rectovesicular space until the bladder disappears (in both planes). Done.
The image (female)
- Find the uterus (generally posterior to the bladder). The pouch of Douglas (rectouterine pouch) is immediately behind it. Scan the entire pouch of Douglas until the uterus and bladder disappear (again, in both planes). And you’re done.
Interpretation
- A positive exam has free fluid
- This is the 1st place blood collects in the lower abdomen
- In men: look for free fluid in the rectovesicular pouch (behind the bladder)
- In women: look for free fluid in the pouch of Douglas
- Know there’s a possibility of false positives, if your probe angle is too steep in the transverse plane. So don’t do this!
- When your probe angle is too steep (aka not perpendicular to the bladder), inferior extraperitoneal structures will appear posterior and intraperitoneal in your image. That means you’re imaging more inferior structures, like seminal vesicles (which contain fluid… can we say false positive), and missing the peritoneal space you should be evaluating.


Video Links (Courtesy of sonocloud.org. If you haven’t checked them out yet, you should.)
Lungs
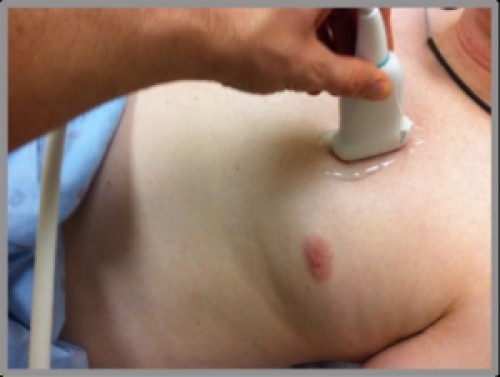
Probe Position
- Ideally, select a linear probe (high frequency) for best image quality.
- If you’re in a hurry (like in an unstable trauma), a phased array or curvilinear probe is fine.
- Orient the probe marker towards the patient’s head. Place the probe over the 3rd and 4th intercostal space.
- Right side: at the midclavicular line
- Left side: at the anterior axillary line (Remember the heart? It’s kind of in the way at the left midclavicular line.)
- Slide the probe along the chest longitudinally.
The Image
- You’ll see ribs and the space between them. Directly underneath the ribs is the pleural line.
- To evaluate the pleural line in a specific location, anchor your probe before you evaluate the image.
- You can also use M mode (look for the button on your machine) to evaluate for pneumothorax. Just put the M mode spike over the area of interest and start.
Interpretation
- You’re looking at the pleural line for signs of a pneumothorax.
- A normal pleural line shimmers or looks like “ants marching in a line”. This is due to sliding of the pleura over one another during breathing. Normal sliding means there is no air in the pleural space and excludes a pneumothorax
- A “dead line”, no movement, suggests a pneumothorax
- The chest wall will still move, so don’t be tricked into thinking chest wall movement is pleural line movement. This is why we anchor the probe before evaluating a specific area.
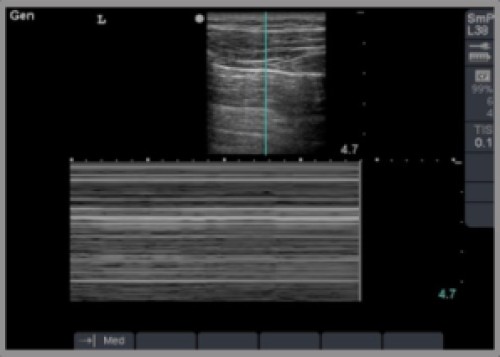
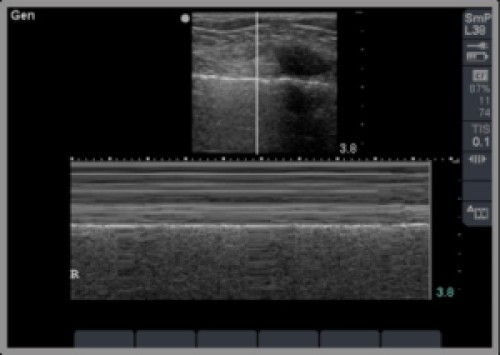
- M mode images are an easy way to look for pneumothorax.
- Seashore sign: lines above the pleural line followed by granularity below the pleural line; means no pneumothorax present
- Barcode sign: nothing but lines for the whole image; means there’s a pneumothorax
- B-lines (comet tails): looks like little rays of white shooting down from the pleural line. This is ONLY seen with intact pleura. If you see this, there is no pneumothorax!
And you already evaluated for hemothorax when you looked above the diaphragm in the liver and spleen views, so you’re done with the eFAST!! Just five quick views and you’ve performed your first eFAST!

Video Links (courtesy of sonocloud.org)
Relevant Anatomy: The Magic Behind an eFAST (Continued from Part 1)
In the pelvic view, anatomy is really important to understanding the eFAST. The borders of the peritoneal and pelvic compartment meet here. It’s important to know where the compartment boundaries are, so you can identify which compartment the free fluid originated from. Because the pelvic region is a dependent area it’s a hot spot for finding free fluid.
In men, you are looking for free fluid in the rectovesicular pouch. This is between the rectum and bladder. Both of these are extra-peritoneal structures, but they are draped in peritoneum superiorly and along the surfaces between them. The space between them is in the peritoneal cavity, so any fluid in the rectovesicular pouch is intra-abdominal free fluid. The inferior border of the rectovesicular pouch can be identified by the prostate, which is an extraperitoneal structure just inferior to the bladder. Another extraperitoneal structure to consider is the seminal vesicles. They are posterior to the inferior portion of the bladder and inferior to the rectovesicular space. Since seminal vesicles contain fluid, this fluid could be falsely identified as intra-peritoneal with improper probe positioning. Seeing distinct, fluid-filled seminal vesicles isn’t the norm, but be aware of them. You might also mistake an extraperitoneal bladder rupture as a positive eFAST with improper probe angling. Since they are treated differently, it’s important to distinguish.
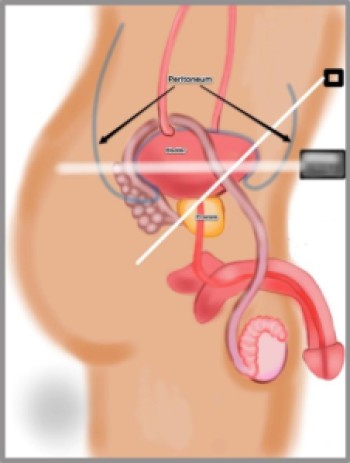
In women, you are looking for free fluid in the pouch of Douglas, the space between the uterus and the rectum. This is intraperitoneal because the peritoneum drapes over the uterus and rectum, leaving a potential space between them that’s still within the peritoneal cavity. When you’re scanning the pelvis, you’ll see bladder most anteriorly, then uterus, and finally rectum. The uterus and rectum have the same peritoneal cover as in men, so the pouch of Douglas is in the peritoneum and free fluid found in it originated from the abdomen.
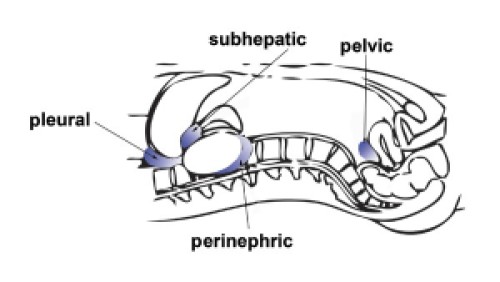
It’s important to know if you’re extraperitoneal vs. intraperitoneal. This is why keeping the probe perpendicular to the patient is so important. If you mistakenly cranked the probe in the transverse view and imaged the bladder at an angle, images that appear posterior to the bladder on your screen would actually be more inferior (see figure 13 below). This would reveal extraperitoneal structures instead of the peritoneum. It’s an easy enough mistake, so be aware of it. Scanning in two planes (longitudinal and transverse) also minimizes false positives and negatives. This is because the longitudinal view can help determine whether fluid is more superior in the rectovesicular/rectouterine pouch or more inferior in an extraperitoneal area. Basically, scan the entire bladder to visualize the entire rectovesicular/rectouterine space and be aware of your probe angle, so you don’t mistake extraperitoneal fluid for intra-abdominal fluid (a false positive) or miss intra-abdominal fluid (a false negative). And that’s it for pelvic anatomy.
The last part of eFAST is the lungs. Here you’re checking for pneumothorax using features of the pleural line and other chest anatomy. The visceral and parietal pleura come together thanks to a little bit of fluid that holds them together. If the pleura are sliding over one another, no pneumothorax is present. A sliding pleural line looks shimmery or like “ants marching in a line” due to the fluid between the layers and the movement of the pleura. Be sure to hold your probe still when evaluating the pleural line, so there’s no illusion of movement. If there is no sliding, you’ll still see a pleural line from the parietal pleura. It just won’t be shimmery or move.
Another feature of intact pleura are comet-tails. These look like comet tails of white radiating down from the pleural line into the lung. They’re caused by fluid and air interfaces distorting the sound waves. If there’s fluid below your pleura, there’s no pneumothorax. So comet tails rule out pneumothorax! And since air tends to rise (duh…) you should evaluate for pneumothorax at the highest point of the chest. It’s like reverse dependence, so scan the anterior apex of each lung.
And that, ladies and gentlemen, concludes our tour of eFAST anatomy.
The Evidence: Don’t Just Take My Word for It
What the folks from the 90’s have to say…
- One of the first studies of emergency physicians performing FAST exams
- Prospective study that trained a group of ER docs how to perform a FAST exam on 245 patients
- FAST exams were 90% sensitive, 99% specific, and 99% accurate!
- Basically: These are some impressive numbers, especially with the older machines from the 90s (back the 20th century)! FAST exams are good stuff people!
What the folks from Switzerland have to say…
- Prospective study of 312 blunt thoracic and abdominal patients
- Found that ultrasound can detect as little as 20ml fluid in the pleural space (winning!)
- FYI x-ray generally requires at least 200ml fluid to detect fluid in the pleural space
- That means ultrasound can detect a hemothorax with only 10% of the blood needed for xray
- Found ultrasound is 98.1% sensitive for detecting intra-abdominal fluid
- Basically – FAST exams are great for detecting free fluid in the abdomen; ultrasound is amazing at detecting fluid in the pleural space and a far superior test than x-ray for hemothorax!
- Prospective study of penetrating cardiac injury comparing 49 patients receiving ultrasound to no ultrasound controls
- Found ultrasound group had significantly faster rate of diagnosis, disposition to care, and survival rates.
- The ultrasound group had 100% survival. The control group had 57% survival.
- That’s a huge difference! I mean come on. A cheap, bedside, non-invasive, radiation-free test that raises your chance of survival from 50/50 to 100% is a no brainer.
- Basically: Pericardial ultrasound = good. No pericardial ultrasound = bad. Pericardial ultrasound gets patients to definitive treatment faster with better survival outcomes. End of story.
What the other heart folks have to say…
- Prospective study of pericardial ultrasound in 261 patients with penetrating truncal injuries
- Found pericardial ultrasound 100% sensitive, 96.9% specific, and 97.3% accurate.
- Found average time from ultrasound to operating room was 12 minutes (that’s crazy fast!)
- Basically: Pericardial ultrasound identifies pericardial injury quickly and accurately, so patients can get definitive care faster.
To be continued in “Life in the eFAST Lane (Part 3)”… Stay tuned for more ultrasound goodness!
References
- Dawson M, and Malin M. Oct 24, 2012. Introduction to Bedside Ultrasound. pp 2-24. Emergency Ultrasound Solutions.
- Dawson M, and Malin M. September 21, 2011. “Episode 08 – A Song for A Scan”. Ultrasound Podcast. http://www.ultrasoundpodcast.com/2011/09/a-song-for-a-scan/, March 2013.
- Lewiss RE, Saul T, and Del Rios M. January 2009. “Focus On: EFAST – Extended Focused Assessment With Sonography for Trauma”. ACEP News. http://www.acep.org/Content.aspx?id=43640, March 2013.
- Ma OJ, Mateer JR, Ogata M, Kefer MP, Wittmann D, Aprahamian C. Prospective analysis of a rapid trauma ultrasound examination performed by emergency physicians. Journal of Trauma, 1995; 38:879-85.
- McNamara D. October 2008. “Use FAST to Quickly Find Fluid in Abdomen, Around Heart”. ACEP News. http://www.acep.org/content.aspx?id=41934, March 2013.
- Plummer D, Brunette D, Asinger R, Ruiz E. Emergency department echocardiography improves outcome in penetratic cardiac injury. Annals of Emergency Medicine. 1992; 21:709–12.
- Reardon R. 2008. “Ultrasound in Trauma – The FAST Exam Focused Assessment with Sonography in Trauma”. Ultrasound Guide to Emergency Physicians.http://www.sonoguide.com/FAST.html, March 2013.
- Rothlin M.A., et al. Ultrasound in blunt abdominal and thoracic trauma. Journal of Trauma. 1993; 34:488-95.
- Rozycki GS, Feliciano DV, Ochsner MG, et al. The role of ultrasound in patients with possible penetrating cardiac wounds: a prospective multicenter study. Journal Trauma. 1999; 46:543-51.
- Stone M. “Emergency Ultrasound Exam”. American College of Emergency Physicians.http://www.emsono.com/acep/exam.html, March 2013
One thought on “Life in the eFAST Lane: Sonography for Trauma (Part 2)”